How to Save macOS Screenshots Anywhere with Shortcuts (Part 2)
Whether you’re working with macOS, iOS, or even iPadOS, there’s no denying that Shortcuts are a game-changer when it comes to simplifying your workflow. These tools are perfect for automating repetitive tasks and saving you valuable time, whether you’re a blogger, content creator, or just someone looking to stay organised. In this post, I'll cover the additions I've added to the Shortcut.
·
Jan 25, 2025

To follow on from my previous post here about automatically moving screenshots to relevant folders, I’ve now updated the Shortcut to give me the opportunity to rename the files before moving them. It’s a small tweak but one that’s made a big difference to my workflow.
So, here’s the deal with the previous Shortcut. It was triggered by an Automator script that kept an eye on my Desktop for files starting with ‘Screenshot’. When it found one, it’d call my macOS Shortcut, which would then ask me where I wanted to move the file. This was already a huge step up from my old way of manually dragging and dropping screenshots into the right folders. But, as with most things, there’s always room for improvement.
Now, instead of simply moving the files to their folders, I get to rename them first, giving each screenshot a more meaningful name. This not only keeps everything organised but also saves me time when I need to search for a specific file later.
Let’s take a closer look at the revisions I’ve made.
The Revised Workflow
The Automator script remains the same. Its job is to filter files saved to the Desktop and look out for filenames that start with ‘Screenshot’. It’s efficient and does exactly what I need it to do without any additional tinkering. The real magic, however, happens in the Shortcut itself.

Gone is the 'Move' action from the Shortcut and I’ve added in four new actions that work together seamlessly:
1. Ask for Input
2. Set Name
3. Save File
4. Delete Files
Here’s how each action works and why it’s such a useful addition:
1. Ask for Input
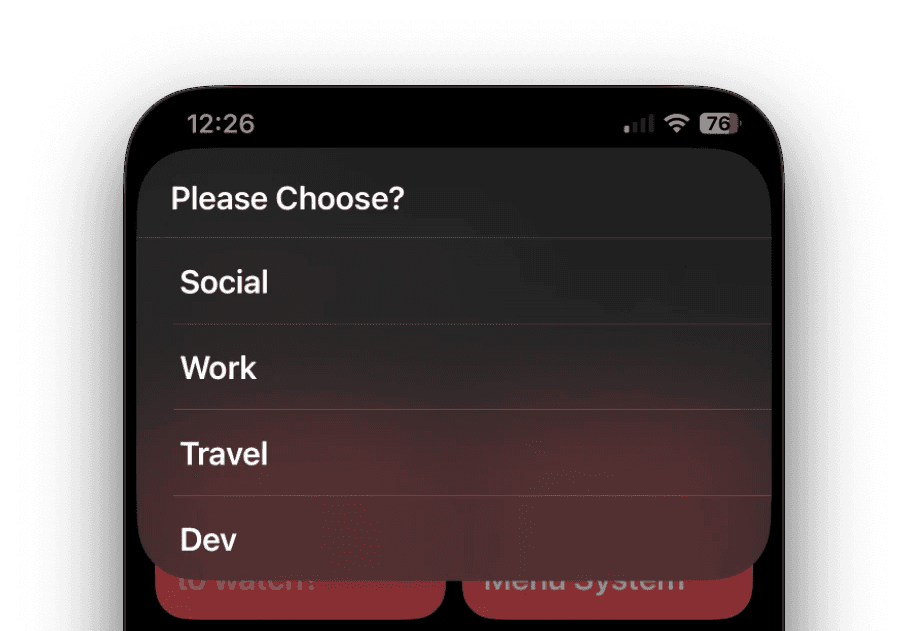
This action is where it all starts. When the Shortcut is triggered, a window pops up asking me to rename the file. By default, macOS names screenshots something like `Screenshot YYYY-MM-DD at HH:MM`. While this naming convention is functional, it’s not exactly helpful when you’re trying to find a specific file weeks or months later. This action allows me to replace that generic name with something more descriptive, like “Subject01” or “Image 01”.
2. Set Name
Once I’ve entered the new name, this action takes my input and applies it to the file. It’s a simple step, but an essential one. Instead of the default filename, the file now has a meaningful name that makes it easy to identify.
3. Save File
Next comes saving the renamed file. This action allows me to choose exactly where the file should go. There’s a critical option here that needs to be enabled: **Ask Where to Save**. By turning this on, the Shortcut prompts me to pick a folder every time I save a file. This gives me complete control over where my screenshots end up—whether it’s a project folder, a client folder, or a general archive.
4. Delete Files
Finally, we have the tidy-up step. Once the file has been renamed and saved, this action deletes the original screenshot that was sitting on the Desktop. This ensures my Desktop stays clean and uncluttered, which is exactly how I like it. There’s a slight downside (as always) - you’ll have to confirm the deletion of the file every time the shortcuts runs.
Why These Changes Matter
This updated Shortcut might seem like a small change, but it’s had a significant impact on my workflow. Before, I was just moving files into folders, which was fine but still left me with generic filenames that weren’t always helpful. Now, I can rename my screenshots as I go, giving them meaningful names and saving them in the right place with minimal effort. It’s a simple way to stay organised, and it’s made finding files later so much easier.
Plus, the ability to tidy up my Desktop as part of the process is an added bonus. I used to let screenshots pile up on my Desktop until I had time to organise them. Now, with this Shortcut, everything happens automatically, and my Desktop stays clutter-free.
How to Make This Work for You
If you deal with a lot of screenshots, I highly recommend trying out this approach. Whether you’re a student managing research notes, a designer keeping track of visual references, or just someone who likes a tidy workspace, this Shortcut can save you time and hassle.
And the best part? It’s completely customisable. You can tweak the actions to suit your workflow, add additional steps, or even combine it with other Shortcuts to create a more complex automation. The possibilities are endless.
Conclusion
This Shortcut update has been a game-changer for me. It’s streamlined my process, reduced clutter, and made it so much easier to stay on top of my screenshots. If you’re looking for a simple way to improve your organisation and save time, give this Shortcut a try. I’d love to hear how it works for you or if you have any ideas for further improvements. Let me know in the comments!
Comments